Path
of the uvmapped textures
For
uvmapping, Povanim doesn’t use the data recorded in the indices table
but
the picture name attached to each face. With consideration for a few
simple
rules concerning the storage of the pictures it must be possible to
export
all the uvmapped coordinates for all the faces .
The script
will always connect an under-directory called "textures" to the
directory
in which the file is exported.
Mixing
the effects
tied to materials
The
variations of the materials classified in the indices table stay
attached
to each face, what the uvmapped picture may be.
Pigment_map
or Texture_map ?
The
depth of pigment or uvmapped texture can be modified in the mixture by
playing on their value in the "card" of pigments (mapping) or textures.
The notions of pigment_map and texture_map must be increase by reading
the official documentation of povray (or, if your are a French-speaking
the official French doc ). In povanim, you can export files by choosing
one or the other. To do this you have to use the textures pannel which
is in the main window of the GUI.
Mixing
the pigment
with the Uvmapped texture
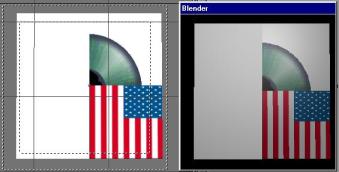
By default
all the exported objects are of light grey. The uvmapped texture is put
and blended to this colour up to 50%. You may find the result too white
to your tastes. Especially if specular effects are pushed high. To pass
round this situation there is three way.
The first
one is to put only a texture and to forget the colour. For this, You
can
find explanation on the finish page, we use the Only Shadow option.
This
method is all the more practical as it applies to a lone material. Thus
parts of the object can me mixed and other not.
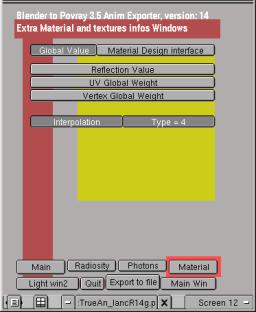
However
you may wish avoiding any modification of the object appearance when
rendered
under Blender. To do so, you can use the second solution: the Global
Settings,
which is located in the Material window of the Povanim GUI. See
below:
|