|
Jean-Michel Soler, fevrier2002/mars
2003
Pour Blender 2.23->2.27
Pour Blender 2.28-> et suivants.
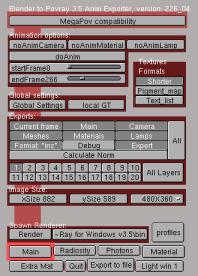
| Compatibilité
megapov et accés aux postprocess |
Compatibility
with megapov and access to post processing |


| En
appuyant sur le bouton MegaPov0.7
compatibiliy Povanim offre l'exportation des données en respectant
les différences nécessaires au format de fichier exigé
par Megapov , c'est-à-dire commençant par la ligne: |
By
pushing the button MegaPov0.7 compatibility Povanim offers you the
ability to export data in accordance with the Megapov file format, that
is to say that the file begins with the line: |
| #version unofficial MegaPov 0.7; |
|
Le choix de la compatibilité
fait apparaître un second bouton qui permet d'accéder aux postprocess.
Ces effets ne sont pas
disponibles dans la version de Povray standard et feront l'objet d'une
page
particulière. Ils sont au nombre de trois: Find
Edges, Posterize
et Focal
Blur |
Once
the compatibility choice is made you see a second button that enables you
the access to post processing.
These effects are not
available in the standard version of Povray and will be studied in a particular
page. There are three of them: Find Edges, Posterize and Focal Blur |
| Evolution
récente: Megapov 1.0 et MlPov 0.8 |
Recent evolution:
Megapov 1.0 et MlPov 0.8 |

|
| Mlpov0.8 permet de
calculer des éclairages avec effets de radiosité en utilisant
des images HDRI. |
|
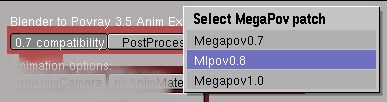 |
| Megapov 1.0 offre une
gestion des effets dynamiques et mechaniques de certains objets . |
|

|
| Animation
(problèmes
avec blender 2.25 et 2.26 ** ) |
|
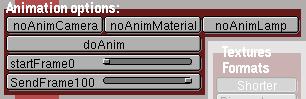
| noAnimCamera
, désactive
l'export de l'animation de la caméra. Donc si la caméra est
immobile autant choisir cette option qui devrait évite rla production
d'un certain nombre de fichiers.
noAnimMateriel,
même fonction pour les matériaux
noAnimLamp, même
fonction pour les lampes
doAnim,
Active l'exportation de l'animation.
startFrame, indique
à partir de quelle image l'animation doit être exportée.
Si la valeur est ZERO alors ce sont les paramètres de Blender qui
sont pris à la place.
SendFrame, indique
l'image de fin d'animation. Cette valeur n'est pas prise en comte si startFrame
affiche 0. |
|
| ATTENTION
!
L'exportation
des objets déformés par armature dans Blender 2.25 et 2.26
demande une précaution supplémentaire. En effet, il est nécessaire
de garder au moins une fenêtre 3d ouverte pour que les modifications
de l'animation soient prises en compte. |
|
Globals
Settings |
|

| Un
page entière est consacrée aux global settings, cliquez
sur l'image ci-dessus.
Formats
des textures. |
A
whole page is dedicated to global settings, click on the picture
here above.
Textures formats. |

-
Shorter
au choix avec Longer, cette option permet de réduire considérablement
le nombre de textures exportées pour un objet donné. Chaque
facette d'un mesh peut être accompagnée d'une texture différente
ce qui, dans certains cas où la définitions de la forme est
très avancée, peut donner des dizaines de milliers d'unités.
On comprend facilement que cela puisse encombrer la mémoire. LA
méthode de tri est cependant assez longue. Ce choix ne chage strictement
rien à l'apparence puisque le script regroupe simplement les textures
qui ont exactemetn la même définition.
-
Longer,
voir Shorter.
|
-
Shorter or Longer
you have to choose, this option allows you to reduce considerably the number
of exported textures for a given object. Each face of a mesh has its own
texture, in some cases where the definition of the shape is very precise
you can have tens of thousands units. You easily understand that this can
congest the memory. The sorting process is pretty long but this choice
doesnt change anything to the appearance; the script only gathers the
textures that have exactly the same definition.
-
Longer, see Shorter.
|
Exemple "Shorter"
1,texture{
pigment{average pigment_map{ [PSphere2_col color rgb<0.8,0.8,0.8>*0.8]
[PSphere2_img Sphere2_img]}}finish{Material_fsh}} |
Exemple "Longer"
5952,
texture{pigment{average pigment_map{ [PSphere2_col color rgb<0.8,0.8,0.8>*0.8][PSphere2_img
Sphere2_img]}}finish{Material_fsh}}
texture{pigment{average pigment_map{ [PSphere2_col color rgb<0.8,0.8,0.8>*0.8][PSphere2_img
Sphere2_img]}}finish{Material_fsh}}
texture{pigment{average pigment_map{ [PSphere2_col color rgb<0.8,0.8,0.8>*0.8][PSphere2_img
Sphere2_img]}}finish{Material_fsh}}
texture{pigment{average pigment_map{ [PSphere2_col color rgb<0.8,0.8,0.8>*0.8][PSphere2_img
Sphere2_img]}}finish{Material_fsh}}
texture{pigment{average pigment_map{ [PSphere2_col color rgb<0.8,0.8,0.8>*0.8][PSphere2_img
Sphere2_img]}}finish{Material_fsh}}
texture{pigment{average pigment_map{ [PSphere2_col color rgb<0.8,0.8,0.8>*0.8][PSphere2_img
Sphere2_img]}}finish{Material_fsh}}
texture{pigment{average pigment_map{ [PSphere2_col color rgb<0.8,0.8,0.8>*0.8][PSphere2_img
Sphere2_img]}}finish{Material_fsh}}
texture{pigment{average pigment_map{ [PSphere2_col color rgb<0.8,0.8,0.8>*0.8][PSphere2_img
Sphere2_img]}}finish{Material_fsh}}
texture{pigment{average pigment_map{ [PSphere2_col color rgb<0.8,0.8,0.8>*0.8][PSphere2_img
Sphere2_img]}}finish{Material_fsh}}
texture{pigment{average pigment_map{ [PSphere2_col color rgb<0.8,0.8,0.8>*0.8][PSphere2_img
Sphere2_img]}}finish{Material_fsh}}
... //5952 fois le même |
|
-
Pigment_map
au choix avec texture_map, cette option permet de définir le format
dans lequel sera effectué le mélange des différents
composants de la couleur de l'objet, voir l'exemple ci-dessus
|
-
Pigment_map or texture_map
to be chosen, this option allows defining the format in which the blending
of the different components of the colour will be made, seeing the example
here above.
|
Exemple "Texture_map"
1,
texture{
average
texture_map{
[PSphere2_col pigment{color rgb<0.8,0.8,0.8>*0.8} finish{Material_fsh}]
[PSphere2_img pigment{Sphere2_img} finish{Material_fsh}]
}}
|
|
-
Texture_map
au choix avec pigment_map. Cliquez le bouton pour basculer
dans ce format. Une définition de ce type se présente comme
dans l'exempel ci-dessus Ce type de format n'est pas très interessant
en matière de rapidité de rendu mais peut être utile
dans crtains cas.
-
Text_list
devrait faire gagner encore plus de place mais cette optionn'est pas encore
utilisable.
Fragmentation
des fichiers |
-
Texture_map or pigment_map to
be chosen. Click the button to enter the setting. A definition of
that kind looks like the example here above. This type of format is not
very interesting concerning rapidity of rendering but can be useful in
particular cases.
-
Text_list should save more storage
capability, but this option is not available yet.
Dividing files in parts |
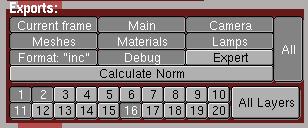
Pour
s'adapter à la forme d'animation de Blender il a fallu découper
les fichiers povray en plusieures parties. Cela offre aussi l'avantage
de ne pouvoir exporter qu'un fragment des données.
-
Currents frame, renvoie
dans la frame courante à la fin de l'exportation. L'alternative
serait de rester dans la dernière frame traitée.
-
Main correspond au fichier
principal, en fait le fichier dans lequel sont définis les globals
settings et les calques de lumière. Si l'on cherhce à régler
des effets de radiosité, il n'est plus nécessaire d'exporter
la totalité du fichier courant, y compris pour une animation.
-
Camera, Meshes,
Materials
et Lamps fonctionnent comme Main masi sans avantage particulier.
Une prochaine version permettra peut-être d'exporter seulement les
données sépararées d'un objet sélectionné.
-
Format: "inc", permettait
d'exporter les données au format texte brute avec une macro pour
les regrouper dan sle fichiers Mesh. Il ets devenu difficile de garder
cette option dan sle évolutions récentes du script. Elle
reviendra peut-être un jour...question de temps et de volonté.
-
Debug permet de débrancher
l'affichage de certaienes données de contrôle dans la console.
-
Expert active/désactive
les tests effectués sur les extensions de fichiers et la présence
ou non de certains objets nécessaires. Ces tests bloquent l'exportation,
l'arrêtent brutalement ce qui peut-être gênant pour certains
utilisateurs avancés qui ont besoin des structures de base de l'exportation
mais peuvent très bien ajouter ou modifier ce qu'il faut pour ne
pas être surpris par les messages d'erreurs de povray.
Recalculer
les normales |
To
meet the animation format of Blender it was necessary to divide the Povray
files in several parts. This structure offers a good advantage; it allows
you to export just one part of the data instead of having to export the
whole each time.
-
Currents frame, send you
back to the current frame at the end of the exportation. The other way
should be to stay in the last processed frame.
-
Main is the main file,
in which are defined the global settings and the layers of lights. If you
want to adjust some radiosity effects, it is no longer necessary to export
the whole current file, although for animation.
-
Camera, Meshes, Materials
and Lamps files work like Main file without any additional advantage.
A next version will probably allow exporting only data separated from a
selected object.
-
Format: "Inc", could
allow exporting data in the raw text format with a macro to gather them
in the Mesh files. It became hard to keep this option in the recent evolution
of the script. It will be back again some day...question of time and will.
-
Debug allows activating
or deactivating the display of certain data in the console window.
-
Expert activate/deactivate
the tests made on the extension of files and the presence or not of certain
necessary objects. These tests stop the exportation, block it abruptly
; such a thing may be annoying for expert users who of course need the
basic structure of exportation but can add and modify what is necessary
in order that they wont be surprised by the povray messages.
Recompiling the normals |
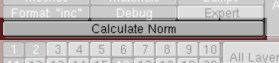
| Un
page entière est consacrée au recalcul des normales
cliquez sur l'image ci-dessus.
Les
calques |
A
whole page is dedicated to the recompiling of the normals click
on the picture here above.
The layers |
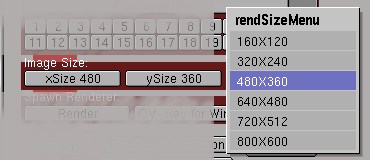
Tailles
de l'image (> Blender 2.25) |
|

| L'API
python des versions égales ou supérieures à blender
2.25, jusqu'à la version 2.28, ne permettait plus d'identifier automatiquement
la taille de l'image affichée en rendu. Il était donc devenu
obligatoire de fournir cette information par l'intermédiaire de
boutons dédiés. Comme il est plus rapide de choisir
dans un menu, une sélection de dimensions standards est aussi proposée.
Avec Blender 2.28, une option
de récupération automatique des dimensions de rendu a été
réimplémenté. Il est donc de nouveau possible
de laisser le script se charger de la taille de l'image. |
The
python API of the blenders versions equal to or older than the 2.25 dont
allow to identify the size of the picture displayed at render. It is necessary
to give this information through the dedicated buttons. As it is easier
to choose options in a menu, a selection of standard sizes is offered. |
Lancer
un logiciel de rendu externe
Le bouton
Render
appelle
soit povray3.5, soit megapov0.7 soit
mlpov 0.8 ou
bien encore megapov1.0 suivant la sélection de compatibilité.
Le bouton de droite correspond au chemin d'accès du fichier exécutif. |
Launching
an external renderer
The button Render calls
povray
3.5, megapov0.7, mlpov 0.8 or megapov1.0 depending
on the selection of compatibility youve made. The right button indicates
the path to reach the executive file. |

| Le nom
du logiciel ainsi que le chemin sont rensseignés dans le script
en clair. |
The name of the software as
well as the path is legibly visible in the script. |
megapov10Path="G:\\stock_logiciel_et_plugin\\3d\\povray\\megapov\\bin\\"
mlpov08Path="G:\\stock_logiciel_et_plugin\\3d\\povray\\mlpov\\bin\\"
povray35Path="F:\\Program Files\\POV-Ray for Windows v3.5\\bin\\"
megapov07Path="F:\\Program Files\\POV-Ray for Windows v3.1\\bin\\"
megapov10Name="megapov.exe"
megapov07Name="megapov.exe"
mlpov08Name="mlpov.exe"
povray35Name="pvengine.exe" |
|
| Pied
de page |
Footer |

 Tous les droits réservés
pour le logo "povanim", les explications, scripts et images sur ces pages
par JM Soler fevrier/juin 2002.Pour toutes les questions touchant les éventuels
problèmes rencontrés avec cette page contacter l'auteur sur
le forum de discussion:3D.Blender
Tous les droits réservés
pour le logo "povanim", les explications, scripts et images sur ces pages
par JM Soler fevrier/juin 2002.Pour toutes les questions touchant les éventuels
problèmes rencontrés avec cette page contacter l'auteur sur
le forum de discussion:3D.Blender |
| GUI visu:Page
précedente |
|
|
Index
principal
|
|